Tuesday, April 15, 2014

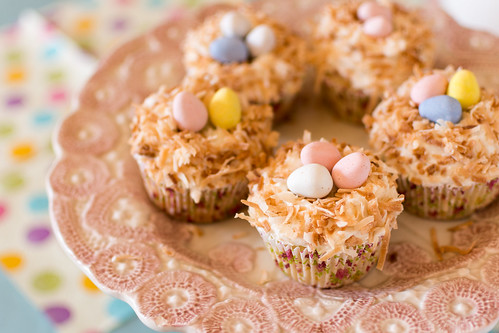
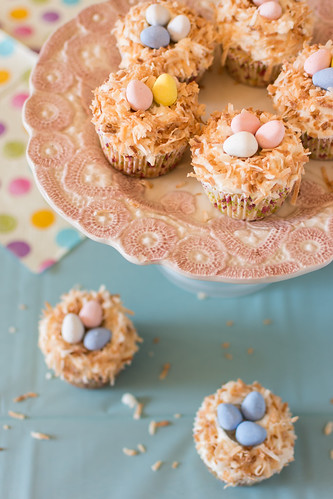
Coconut Bird Nest Cupcakes

Coconut Bird Nest Cupcake 

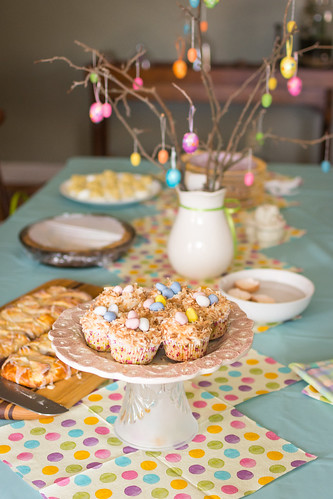
This past weekend I had a totally adorable Easter/Spring party complete with an Easter Egg Hunt! I'm sure it was almost as much fun for my neighbors to watch a bunch of grown ass adults run around the yard looking for eggs as it was for us to find them. More fun than it was being a kid though because I get to swear at my friends and eat as much candy as I want - and no one can stop me!
  
Easter Party!
Look how CUTE!!!

After not baking for over a month I was pretty eager to flex my culinary muscle. There was quiche, deviled eggs, rainbow fruit on a stick, biscuits, cream cheese strawberry rhubarb danish, and of course these sweet little coconut bird nest cupcakes! 

Earlier in the day, before I had tasted one, I was lamenting to my friend that I have yet to find a vanilla cake recipe I really like, and that they all tend to have a heavy, cornbready flavor and texture to me. Despite the fact that these are coconut cupcakes, I think this will be my go-to vanilla cake recipe as well! The coconut flavor is mild enough that you might miss it if not for the addition of some shredded coconut (if you want it to be more prominent, I suggest adding a touch of coconut extract to the cake, frosting, or both). The texture, though, is perfect - light, but not too delicate, and moist without being greasy. I only wish my carb-deprived belly could have fit more!

Coconut Bird Nest Cupcake

Coconut Bird Nest Cupcakes
Makes 18-20 cupcakes

For the reduced coconut milk:
2 13-14oz cans unsweetened coconut milk

For the cake:
2 cups all purpose flour
2 1/2 tsp baking powder
1/2 tsp salt
3/4 cup unsalted butter, room temp
1 1/3 cup sugar
3 large eggs, room temp
1 cup reduced coconut milk, room temp
seeds scraped from 1 vanilla bean
(coconut extract to taste, optional)

For the frosting:
1 cup unsalted butter, room temp
2 1/2 cups confectioner's sugar
1/3 cup reduced coconut milk, room temp
2 Tbsp coconut rum
seeds scraped from 1 vanilla bean
1/8 tsp salt
(coconut extract to taste, optional)
1 1/2 cups sweetened coconut, lightly toasted
1 8 oz bag Cadbury mini eggs

1. For the reduced coconut milk: Pour coconut milk into a deep, medium sized saucepan and bring to a boil over medium high heat. Reduce heat to medium-low and simmer until reduced to 1 1/2 cups, stirring occasionally, about 30-45 minutes. Remove from heat and cool completely. 

2. For the cupcakes: Position rack in center of oven and preheat to 350F. Line a muffin tin with paper liners. Whisk the flour, baking powder and salt in a medium bowl.

3. In the bowl of a stand mixer, beat the butter with the paddle attachment until smooth, then add the sugar and beat on medium high speed, scraping the sides of the bowl occasionally, until light and fluffy, about 2 minutes. Add 2 eggs, one at a time, beating well after each addition and scraping down the sides of the bowl, then beat in the vanilla bean seeds and remaining egg. Add half of the flour mixture and mix on low just until lightly blended. Add the 1 cup reduced coconut milk and mix just until blended. Finally, add the remaining flour mixture and mix until blended. 

4. Divide the batter among the prepare muffin tins and bake until cupcake tops spring back when gently touched and a cake tester inserted in the center of a cupcake comes out clean, about 20 minutes. Transfer cupcakes in tins to rack and cool for 10 minutes before removing from tins to the rack to cool completely. 

5. For the frosting: In the bowl of a stand mixer using the paddle attachment, beat the butter until smooth. Add the confectioner's sugar, reduced coconut milk, rum, vanilla bean seeds and salt and beat on medium low until blended, occasionally scraping down the sides of the bowl. Increase speed to medium high for a minute until light and fluffy. 

6. To decorate, top each cupcake with 2 tablespoons or so of frosting, and spread the frosting around so there is a small indent in the frosting in the center of the cupcake, almost exposing the cake. Gently press the toasted coconut around the frosting, then arrange your eggs in their "nest." Enjoy!
Thursday, February 13, 2014

Blood Orange Panna Cotta

Blood Orange Panna Cotta

It's Valentine's Day eve. Maybe you're procrastinator and had grand ideas about a romantic dinner for your sweetie but never actually got around to planning it. I'm sure you're in good company. 

I'm a procrastinator too. Normally around this time of year I like to make all sorts of dumb little Valentine's Day baked goods and crafts. I don't know why. I'm not crazy for the manufactured love of V-day. Maybe it takes me back to my childhood where all the little twits in my class had to pretend to be nice to me for one day and give me a card.. suckers.

This year however, I did nothing. I kept putting it all off, and with snowstorm after snowstorm, mid-February sort of just snuck up on me. C'est la vie. I did make these panna cotta though, and the good news is you too can STILL make these for tomorrow! Hell, you can put it off for another 12 or 16 hours if you want and still have them ready for V-day evening. Hooray for procrastination! 

Blood Orange Panna Cotta

Blood Orange Panna Cotta
(makes 12-14  4oz mason jars, or about 6 cups)

For the Panna Cotta:
3/4 cup sugar
3/4 cup milk
3/4 cup heavy cream
seeds of 1 vanilla bean, pod reserved
1 1/2 tsp fresh ground cardamom
2 tsp blood orange zest
1/2 tsp salt
3 cups Greek yogurt
3/4 cup blood orange juice (about 3-4 oranges)
4 tsp unflavored gelatin

For the Blood Orange Syrup:
3/4 cup blood orange juice (about 3-4 oranges)
1/2 cup water
1/4 cup honey
1 tsp pink peppercorns
3 cardamom pods, crushed
2 blood oranges, supremed
chopped pistachios, for serving

1. To prepare the panna cotta: In a small bowl add the 3/4 cup blood orange juice and sprinkle the gelatin on top to let it bloom. Set aside.

2. In a small saucepan set over medium low heat, combine the sugar, milk, heavy cream, vanilla seeds and pot, cardamom, zest and salt. Stir just until the sugar is fully dissolved, taking care not to heat the milk too much. Remove from the heat and stir in the yogurt. Remove the vanilla pod, squeezing out any vanilla goodness inside and discard. Stir in the bloomed gelatin mixture, stirring until dissolved and no lumps remain. Pour the panna cotta mixture into individual mason jars or greased molds (if planning to unmold) and refrigerate for at least 2 hours, or until set.

3. To prepare the syrup: In a small saucepan combine the juice, water, honey, peppercorn and cardamom pods. Bring to a simmer and reduce by half. Allow it to cool to room temperature then use fine sieve to strain out the peppercorns and cardamom pots, reserving the syrup in a small bowl. Add the blood orange supremes to the syrup and refrigerate until needed.  

4. To serve: If unmolding, gently use a thin knife around the edges of your mold to loosen the panna cotta and unmold on your serving dish (otherwise serve directly from your jars.) Pour a few spoonfuls of syrup on top along with a couple orange supremes and garnish with chopped pistachios.

(inspired by and adapted from Yes, More Please!)

Monday, January 27, 2014

Raspberry Curd

Raspberry Curd

Like much of the country it's been extra cold and dreary here the past few weeks. This part of winter is always the hardest - a long stretch of not much to look forward to before Spring arrives, besides more cold and more snow of course. 

Warm and hearty comfort cooking makes the long nights slightly more bearable, but I've been craving something bright and summery to lift my spirits. After baking a couple batches of macarons I had just enough leftover egg yolks to create a luscious and tangy fruit curd. Berries always mean summer to me, so armed with some frozen fruit I set off to make some raspberry curd.

If you don't have some of last years' berries stored away in your freezer, frozen berries are easy to find in your grocery store, inexpensive and flavorful. This curd isn't as thick as a traditional lemon curd, but it's still spoonable and perfect to spread on scones and muffins, stir into yogurt or oatmeal, flavor buttercream and, of course, just eat with a spoon!

Raspberry Curd

Raspberry Curd
(makes about 2 cups)

12 oz frozen raspberries, fully thawed
1 stick (8 oz) butter
3/4 cup sugar
2 Tbsp fresh lemon juice
6 egg yolks
pinch of salt

1. Over medium heat melt the butter in a medium saucepan. Add the thawed berries and any accumulated juices, sugar, lemon juice, egg yolks and salt and whisk until well combined. Cook over medium heat, making sure to mash the berries and whisk frequently, until thickened, about 5-10 minutes. Pour the mixture through a fine mesh sieve, pressing on the solids to extract as much liquid as possible and collecting it in a small bowl. Discard the solids and mix the liquid mixture until uniform. Cover with plastic wrap placing the plastic wrap directly on the top of the liquid and refrigerate until cool. Store in fridge in an airtight container.

Wednesday, January 15, 2014

Pumpkin, charred kale & onion tacos

Pumpkin, charred onion & kale tacos

Back in November I went for a mini foodie tour of Philly. I indulged in much gelato from Capogiro, ice cream at The Franklin Fountain, and lots of cheese and other goodies from Reading Terminal Market. (Can you tell I like dairy?) But for me, the standout dish was the seasonal pickle special at Village Whiskey - pickled pumpkin and charred kale served with toasted sourdough and ricotta.

 It was so simple, but so magical! The sweet pumpkin paired with slightly bitter charred kale, the vinegar cutting through the richness of the ricotta, and the satisfying crunch of the toast. SO GOOD! I haven't stopped thinking about it!

Inspired by that dish I came up with these tacos to satisfy my craving. No need to pickle anything - the tang comes from a sweet balsamic drizzle. If you can't find a fresh pumpkin, use a more readily available squash - like butternut - or even a sweet potato.


Pumpkin, charred kale & onion tacos
with ricotta and balsamic drizzle

1/2 cup balsamic vinegar
2 Tbsp pure maple syrup
3 cups fresh pumpkin, peeled and cut into bite sized pieces
2 Tbsp olive oil, plus 1/2 tsp, divided
3/4 tsp smoked paprika
1 small bunch kale, stemmed, leaves coarsely chopped
1 yellow onion, sliced
1/4 cup roasted pepitas
salt & pepper
fresh whole milk ricotta

1. To make the balsamic drizzle, pour the balsamic vinegar and maple syrup into a small sauce pan. Bring to a boil then reduce heat to medium and let simmer until it has reduced by about 1/2 and has a slightly syrupy consistency, about 10 minutes. Remove from heat and set aside to cool.

2. Preheat oven to 425F. On a lightly oiled baking sheet toss the cubed pumpkin with 1 Tbsp olive oil, smoked paprika and season generously with salt and pepper. Spread pumpkin evenly over the baking sheet and roast in the preheated oven, stirring occasionally, until pumpkin is soft and brown in spots, about 20-30 minutes. Transfer pumpkin to a large bowl and set aside.

3. Set your oven to broil and set an oven rack about 3 inches below your broiler. Toss the kale leaves onto the same baking sheet you used for the pumpkin. Massage 1 Tbsp of oil into the kale leaves and season lightly with salt. Spread evening over the pan and then top the kale with slices of onion. Place kale and onion into the oven and broil for about 5 minutes, or until the onion is starting to brown and the kale is blackened in spots. Remove from oven and transfer to the bowl with the pumpkin. Gently mix the pumpkin, kale and onions together and season to taste with salt and pepper. 

4. To assemble, spread a dollop of fresh ricotta onto a corn tortilla, top with the pumpkin and kale mixture, a drizzle of the balsamic glaze and sprinkling of roasted pepitas. 

Wednesday, January 1, 2014

Figgy Maple Bourbon Fizz

Figgy Maple Bourbon Fizz

Happy 2014! I hope the holidays treated you well and you're not too tired of the kitchen. I somehow managed to come out of it alive, albeit with a few pounds to spare!

Despite all the dietary resolutions floating around out there today, I'm not giving you a recipe for kale or spaghetti squash. That's not to say I'm not reining it in around here too, but I feel like you probably need a little bourbon in your life all year long. 

A few weeks before the holidays I was gifted (well, swapped!) a couple different homemade bitters from Kate at Snowflake Kitchen which inspired me to come up with something a little different to mix up and sip on. The vanilla maple coconut bitters included in this recipe are super yummy and add just a little extra suntin'-suntin' to the overall flavor of this drink, but if you don't have the time to whip up your own you can swap them out for another variety of bitters. And if finding fresh figs at your local grocery store is hit or miss around you as it often is for me, you can make the fig-infused bourbon with dried figs, omit the fresh fig in the muddling step and still have a lovely figgy cocktail!

Figgy Maple Bourbon Fizz

Figgy Maple Bourbon Fizz
(makes 2 cocktails)

Fig-infused bourbon:
fresh figs, halved
bourbon
mason jar, or other clean glass vessel with cover

1. Fill your mason jar, or other container, halfway with fresh figs. Top off with bourbon, cover, and let sit for 5-7 days, giving it a gentle swirl once a day or so. Once infused, strain the bourbon through a sieve (reserve the figs for another use like a boozy jam) and pour bourbon into another clean jar for storage.

Figgy Maple Bourbon Fizz:
1 fresh fig, halved
2 tsp pure maple syrup, the darker the better
squeeze fresh lemon juice
few dashes vanilla coconut maple bitters, or angostura bitters
3 oz fig-infused bourbon
ginger beer

1. Divide the fig between 2 old fashioned glasses. To each glass add 1 tsp maple syrup, small squeeze of fresh lemon juice and a couple dashes of bitters. Muddle ingredients in each glass until well incorporated. Fill glasses with ice, pour 1 1/2 oz of the fig infused bourbon over each and then top with ginger beer. Give a quick stir and enjoy!

Tuesday, December 17, 2013

Sugar & Spice Cookies

Sugar & Spice Cookies

So like, things are getting a little crazy around here. I'm running out of room in the freezer for cookies. And pierogi. But mostly cookies. 

I'm probably making too many cookies for the holidays (I can't believe I just said that), but there are certain cookies that just make it feel like Christmas time to me. My mom always used to make these sugar & spice cookies around this time of year. They were special "Christmas time" cookies in my little brain, and I don't remember eating them any other time of the year. Now my Christmas cookie baking marathons just don't feel complete without them!

They're good too. Real good. Slightly crisp on the outside, but chewy in the middle. There's depth from the molasses, and just the right amount of spice without getting too gingerbready. The recipe calls for shortening, but I have used butter with good results as well - just slightly crisper and the cookie will spread more. The dusting of powdered sugar is totally not optional, by the way. It's Christmas, ok? Everyone needs a little snow in their life! 

Sugar & Spice Cookies

Sugar & Spice Cookies
(makes about 5 dozen)

1 1/2 cups shortening, room temperature
2 cups sugar
2 eggs
1/2 cup molasses
4 cups all purpose flour
4 tsp baking soda
1 tsp salt
2 tsp cinnamon
1 1/2 tsp ground cloves
1 1/2 tsp ground ginger
powdered sugar, for dusting

1. Preheat oven to 375F. Line 2 baking sheets with parchment paper. Position your oven racks in the top and bottom thirds of your oven.

2.  In a large bowl, sift together the flour, baking soda, salt, cinnamon, cloves and ginger. set aside.

3. In the bowl of a stand mixer cream together the shortening and sugar with the paddle attachment until light and fluffy. Beat in the eggs one at a time, and then the molasses until well combined. Add the dry ingredients and mix until a uniform dough forms . Be sure to scrape the sides and the bottom of the bowl while mixing - this is a large amount of stiff dough and dry ingredients like to pool at the bottom of the mixer.

4. Roll the dough into small bowls about the size of a tablespoon and place on the prepared baking sheets about 2 inches apart. Bake for 10-12 minutes, switching the baking sheets between racks halfway through, or until the cookies are puffed and slightly cracked all over. Remove from oven and let cool on the baking sheet for about 2 minutes before cooling completely on wire racks. Repeat with the remaining dough. Once the cookies are completely cool, dust lightly with powdered sugar.

Wednesday, December 11, 2013

Loaded Baked Potato Dip with crispy fingerling potatoes

DSC_5880.jpg

I thought about saving this one for the NFL playoffs or the Superbowl, but then I realized you all are probably doing a lot of partying these days. What with all the holiday family gatherings, work parties, Christmas and New Year's Eve. Maybe a super easy, crowd pleasing dip would come in handy right about now?

This dip has all the toppings you love on a baked potato - sour cream, cheese, bacon, some chives. Only this way you get a higher toppings to potato ratio which is all anyone really wants, right? If you're traveling with this then just serve it with some thick-cut potato chips, but if you're home and have the oven space, it totally deserves to be kicked up a notch with creamy, crispy-skinned fingerling potatoes. Little mini baked potato dippers! Just make sure to have some pronged toothpicks or forks so you can get a good grip on the little buggers!

DSC_5883.jpg

Loaded Baked Potato Dip 
with crispy fingerling potatoes

For the dip:
12 slices thick cut smoked bacon, or about 12 oz, cooked until crisp
1 cup sour cream
1 cup greek yogurt
2 cups sharp cheddar cheese, shredded
1/4-1/3 cup chopped fresh chives
LOTS of black pepper (if that's your thing)

For the fingerling potatoes:
1 1/2 lbs of the smallest fingerling potatoes you can find
1-2 Tbsp olive oil
salt & pepper

1. In the bowl of a food processor add the cooked bacon (broken into pieces), sour cream, yogurt, cheddar, chives and a few grinds of black pepper. Pulse 5-10 times, or until the dip is well combined but still slightly chunky. Cover and chill in the fridge for at least 30 minutes to an hour. (If you chill it for much more than this, bring it back to room temperature for about 30 minutes before serving)

2. While your dip is chilling, roast the potatoes. Preheat oven to 425F. Clean up the potatoes and dry well. If the potatoes are on the larger side, cut in half, or otherwise bite sized pieces. In a bowl, toss the potatoes with 1-2 Tbsp olive oil until well coated. Spread evenly on a greased baking sheet, or 2 baking sheets if needed, and sprinkle with salt. Bake for 20-25 minutes, or until potatoes are soft on the inside and the skin is slightly crispy. Serve warm with dip.