Showing posts with label Dessert. Show all posts

Tuesday, April 15, 2014

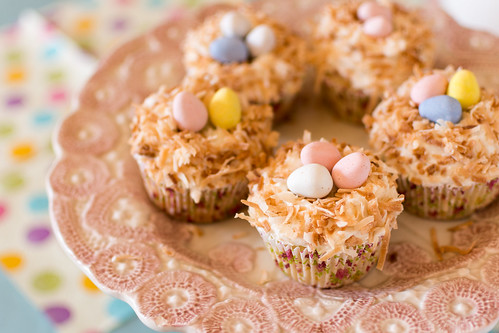
Coconut Bird Nest Cupcakes

Coconut Bird Nest Cupcake 

This past weekend I had a totally adorable Easter/Spring party complete with an Easter Egg Hunt! I'm sure it was almost as much fun for my neighbors to watch a bunch of grown ass adults run around the yard looking for eggs as it was for us to find them. More fun than it was being a kid though because I get to swear at my friends and eat as much candy as I want - and no one can stop me!
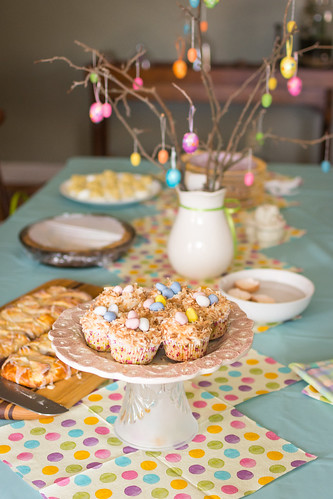
  
Easter Party!
Look how CUTE!!!

After not baking for over a month I was pretty eager to flex my culinary muscle. There was quiche, deviled eggs, rainbow fruit on a stick, biscuits, cream cheese strawberry rhubarb danish, and of course these sweet little coconut bird nest cupcakes! 

Earlier in the day, before I had tasted one, I was lamenting to my friend that I have yet to find a vanilla cake recipe I really like, and that they all tend to have a heavy, cornbready flavor and texture to me. Despite the fact that these are coconut cupcakes, I think this will be my go-to vanilla cake recipe as well! The coconut flavor is mild enough that you might miss it if not for the addition of some shredded coconut (if you want it to be more prominent, I suggest adding a touch of coconut extract to the cake, frosting, or both). The texture, though, is perfect - light, but not too delicate, and moist without being greasy. I only wish my carb-deprived belly could have fit more!
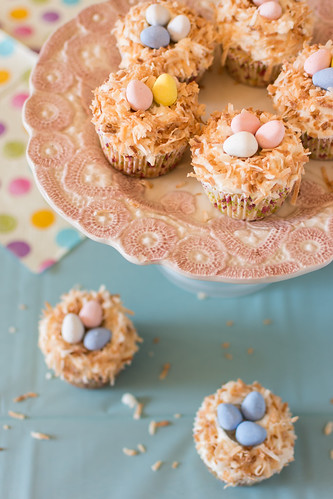
Coconut Bird Nest Cupcake

Coconut Bird Nest Cupcakes
Makes 18-20 cupcakes

For the reduced coconut milk:
2 13-14oz cans unsweetened coconut milk

For the cake:
2 cups all purpose flour
2 1/2 tsp baking powder
1/2 tsp salt
3/4 cup unsalted butter, room temp
1 1/3 cup sugar
3 large eggs, room temp
1 cup reduced coconut milk, room temp
seeds scraped from 1 vanilla bean
(coconut extract to taste, optional)

For the frosting:
1 cup unsalted butter, room temp
2 1/2 cups confectioner's sugar
1/3 cup reduced coconut milk, room temp
2 Tbsp coconut rum
seeds scraped from 1 vanilla bean
1/8 tsp salt
(coconut extract to taste, optional)
1 1/2 cups sweetened coconut, lightly toasted
1 8 oz bag Cadbury mini eggs

1. For the reduced coconut milk: Pour coconut milk into a deep, medium sized saucepan and bring to a boil over medium high heat. Reduce heat to medium-low and simmer until reduced to 1 1/2 cups, stirring occasionally, about 30-45 minutes. Remove from heat and cool completely. 

2. For the cupcakes: Position rack in center of oven and preheat to 350F. Line a muffin tin with paper liners. Whisk the flour, baking powder and salt in a medium bowl.

3. In the bowl of a stand mixer, beat the butter with the paddle attachment until smooth, then add the sugar and beat on medium high speed, scraping the sides of the bowl occasionally, until light and fluffy, about 2 minutes. Add 2 eggs, one at a time, beating well after each addition and scraping down the sides of the bowl, then beat in the vanilla bean seeds and remaining egg. Add half of the flour mixture and mix on low just until lightly blended. Add the 1 cup reduced coconut milk and mix just until blended. Finally, add the remaining flour mixture and mix until blended. 

4. Divide the batter among the prepare muffin tins and bake until cupcake tops spring back when gently touched and a cake tester inserted in the center of a cupcake comes out clean, about 20 minutes. Transfer cupcakes in tins to rack and cool for 10 minutes before removing from tins to the rack to cool completely. 

5. For the frosting: In the bowl of a stand mixer using the paddle attachment, beat the butter until smooth. Add the confectioner's sugar, reduced coconut milk, rum, vanilla bean seeds and salt and beat on medium low until blended, occasionally scraping down the sides of the bowl. Increase speed to medium high for a minute until light and fluffy. 

6. To decorate, top each cupcake with 2 tablespoons or so of frosting, and spread the frosting around so there is a small indent in the frosting in the center of the cupcake, almost exposing the cake. Gently press the toasted coconut around the frosting, then arrange your eggs in their "nest." Enjoy!


Thursday, February 13, 2014

Blood Orange Panna Cotta

Blood Orange Panna Cotta

It's Valentine's Day eve. Maybe you're procrastinator and had grand ideas about a romantic dinner for your sweetie but never actually got around to planning it. I'm sure you're in good company. 

I'm a procrastinator too. Normally around this time of year I like to make all sorts of dumb little Valentine's Day baked goods and crafts. I don't know why. I'm not crazy for the manufactured love of V-day. Maybe it takes me back to my childhood where all the little twits in my class had to pretend to be nice to me for one day and give me a card.. suckers.

This year however, I did nothing. I kept putting it all off, and with snowstorm after snowstorm, mid-February sort of just snuck up on me. C'est la vie. I did make these panna cotta though, and the good news is you too can STILL make these for tomorrow! Hell, you can put it off for another 12 or 16 hours if you want and still have them ready for V-day evening. Hooray for procrastination! 

Blood Orange Panna Cotta

Blood Orange Panna Cotta
(makes 12-14  4oz mason jars, or about 6 cups)

For the Panna Cotta:
3/4 cup sugar
3/4 cup milk
3/4 cup heavy cream
seeds of 1 vanilla bean, pod reserved
1 1/2 tsp fresh ground cardamom
2 tsp blood orange zest
1/2 tsp salt
3 cups Greek yogurt
3/4 cup blood orange juice (about 3-4 oranges)
4 tsp unflavored gelatin

For the Blood Orange Syrup:
3/4 cup blood orange juice (about 3-4 oranges)
1/2 cup water
1/4 cup honey
1 tsp pink peppercorns
3 cardamom pods, crushed
2 blood oranges, supremed
chopped pistachios, for serving

1. To prepare the panna cotta: In a small bowl add the 3/4 cup blood orange juice and sprinkle the gelatin on top to let it bloom. Set aside.

2. In a small saucepan set over medium low heat, combine the sugar, milk, heavy cream, vanilla seeds and pot, cardamom, zest and salt. Stir just until the sugar is fully dissolved, taking care not to heat the milk too much. Remove from the heat and stir in the yogurt. Remove the vanilla pod, squeezing out any vanilla goodness inside and discard. Stir in the bloomed gelatin mixture, stirring until dissolved and no lumps remain. Pour the panna cotta mixture into individual mason jars or greased molds (if planning to unmold) and refrigerate for at least 2 hours, or until set.

3. To prepare the syrup: In a small saucepan combine the juice, water, honey, peppercorn and cardamom pods. Bring to a simmer and reduce by half. Allow it to cool to room temperature then use fine sieve to strain out the peppercorns and cardamom pots, reserving the syrup in a small bowl. Add the blood orange supremes to the syrup and refrigerate until needed.  

4. To serve: If unmolding, gently use a thin knife around the edges of your mold to loosen the panna cotta and unmold on your serving dish (otherwise serve directly from your jars.) Pour a few spoonfuls of syrup on top along with a couple orange supremes and garnish with chopped pistachios.

(inspired by and adapted from Yes, More Please!)

Monday, January 27, 2014

Raspberry Curd

Raspberry Curd

Like much of the country it's been extra cold and dreary here the past few weeks. This part of winter is always the hardest - a long stretch of not much to look forward to before Spring arrives, besides more cold and more snow of course. 

Warm and hearty comfort cooking makes the long nights slightly more bearable, but I've been craving something bright and summery to lift my spirits. After baking a couple batches of macarons I had just enough leftover egg yolks to create a luscious and tangy fruit curd. Berries always mean summer to me, so armed with some frozen fruit I set off to make some raspberry curd.

If you don't have some of last years' berries stored away in your freezer, frozen berries are easy to find in your grocery store, inexpensive and flavorful. This curd isn't as thick as a traditional lemon curd, but it's still spoonable and perfect to spread on scones and muffins, stir into yogurt or oatmeal, flavor buttercream and, of course, just eat with a spoon!

Raspberry Curd

Raspberry Curd
(makes about 2 cups)

12 oz frozen raspberries, fully thawed
1 stick (8 oz) butter
3/4 cup sugar
2 Tbsp fresh lemon juice
6 egg yolks
pinch of salt

1. Over medium heat melt the butter in a medium saucepan. Add the thawed berries and any accumulated juices, sugar, lemon juice, egg yolks and salt and whisk until well combined. Cook over medium heat, making sure to mash the berries and whisk frequently, until thickened, about 5-10 minutes. Pour the mixture through a fine mesh sieve, pressing on the solids to extract as much liquid as possible and collecting it in a small bowl. Discard the solids and mix the liquid mixture until uniform. Cover with plastic wrap placing the plastic wrap directly on the top of the liquid and refrigerate until cool. Store in fridge in an airtight container.

Tuesday, December 17, 2013

Sugar & Spice Cookies

Sugar & Spice Cookies

So like, things are getting a little crazy around here. I'm running out of room in the freezer for cookies. And pierogi. But mostly cookies. 

I'm probably making too many cookies for the holidays (I can't believe I just said that), but there are certain cookies that just make it feel like Christmas time to me. My mom always used to make these sugar & spice cookies around this time of year. They were special "Christmas time" cookies in my little brain, and I don't remember eating them any other time of the year. Now my Christmas cookie baking marathons just don't feel complete without them!

They're good too. Real good. Slightly crisp on the outside, but chewy in the middle. There's depth from the molasses, and just the right amount of spice without getting too gingerbready. The recipe calls for shortening, but I have used butter with good results as well - just slightly crisper and the cookie will spread more. The dusting of powdered sugar is totally not optional, by the way. It's Christmas, ok? Everyone needs a little snow in their life! 

Sugar & Spice Cookies

Sugar & Spice Cookies
(makes about 5 dozen)

1 1/2 cups shortening, room temperature
2 cups sugar
2 eggs
1/2 cup molasses
4 cups all purpose flour
4 tsp baking soda
1 tsp salt
2 tsp cinnamon
1 1/2 tsp ground cloves
1 1/2 tsp ground ginger
powdered sugar, for dusting

1. Preheat oven to 375F. Line 2 baking sheets with parchment paper. Position your oven racks in the top and bottom thirds of your oven.

2.  In a large bowl, sift together the flour, baking soda, salt, cinnamon, cloves and ginger. set aside.

3. In the bowl of a stand mixer cream together the shortening and sugar with the paddle attachment until light and fluffy. Beat in the eggs one at a time, and then the molasses until well combined. Add the dry ingredients and mix until a uniform dough forms . Be sure to scrape the sides and the bottom of the bowl while mixing - this is a large amount of stiff dough and dry ingredients like to pool at the bottom of the mixer.

4. Roll the dough into small bowls about the size of a tablespoon and place on the prepared baking sheets about 2 inches apart. Bake for 10-12 minutes, switching the baking sheets between racks halfway through, or until the cookies are puffed and slightly cracked all over. Remove from oven and let cool on the baking sheet for about 2 minutes before cooling completely on wire racks. Repeat with the remaining dough. Once the cookies are completely cool, dust lightly with powdered sugar.

Wednesday, October 23, 2013

Peanut Butter S'mores Bars

Peanut Butter S'mores Bars

I love s'mores. I think for many people they conjure childhood memories of camping with family or hanging out with friends by a fire on a crisp late summer night. Also, they're delicious. Who can resist ooey gooey toasty marshmallow and chocolate sandwiched between 2 imitable Nabisco graham crackers?

But let's be honest, a true s'more is for special occasions. No one is going out in their backyard and lighting a campfire to toast a single marshmallow whenever a craving strikes. No, you're probably going to do something sick and twisted like stick a graham cracker, chocolate and marshmallow in the microwave and pray it doesn't explode (oh, you know you've done it!)

S'mores-inspired baked goods  are the way to go in this situation. Or for an impatient sweets- craving crowd. Or for when you want to eat something a little more neatly and ladylike (I don't have this problem...) These peanut butter s'mores bars have the added bonus of satisfying the peanut butter chocolate lover in your life too! Enjoy!

Peanut Butter S'mores Bars
(makes 16 bars)

3/4 cup graham cracker crumbs, about 14 whole crackers
1 1/3 cup all purpose flour
1 tsp baking powder
1/4 tsp salt
6 Tbsp butter, softened
1/3 cup plus 2 Tbsp peanut butter, divided
1/2 cup sugar
1/4 cup brown sugar, packed
1 large egg
1 tsp vanilla extract
2 XL Hershey's milk chocolate bar, or your favorite chocolate bars broken to fit the pan
1 1/2 cup marshmallow fluff


1. Preheat oven to 350F. Grease an 8x8 inch square pan.

2. In a small bowl whisk together graham cracker crumbs, flour, baking powder and salt. Set aside.

3. Cream together butter, 2 Tablespoons peanut butter, and sugars until light and fluffy. Add the egg and vanilla and beat until smooth. Add the flour mixture and mix until combined. 

4. Divide dough in half and press half in an even layer on the bottom of the prepared pan. Place the 2 chocolate bars on top of the dough in a single layer, they should fit just perfectly. Spread the chocolate with the marshmallow fluff. (Optional but delicious addition: before spreading the marshmallow fluff, first add the fluff to a small bowl and use a small kitchen torch to toast the top, then stir and toast again. Do this several times until the fluff has a nice toasty flavor.) Dollop the remaining 1/3 cup peanut butter around the top of the fluff and swirl around evenly. Place the remaining dough in an even layer on top of the peanut butter and fluff. You can do this a few ways - I usually break it into smaller pieces, flatten them out and then piece them together on top. Do your best to cover it all without any fluff peeking through. 

5. Bake for 30-35 minutes, or until light brown on top. Let cook completely then cut into 16 squares.

Tuesday, August 27, 2013

S'mores Cupcakes

DSC_1279.jpg

So my last post over a year ago was about cupcakes, and my triumphant return is about cupcakes too. I'm ok with this. I swear I'm not a one trick pony.

I recently got a new camera! Well, sort of. It's more of a shared custody situation. Pretty soon there will be arguments over who gets it for the weekend, or Christmas Eve or Day, and it needs to be home by 6 O'CLOCK!! And by God, it better have had a good dinner...

In any case, it's a total game changer for my food photography, mostly because of it's low-light performance. A tripod isn't always practical in my set up so capturing usable handheld images in dim lighting is awesome since I'm not home in the middle of the afternoon. My D80 is great, but the D7100 is baller!

Onto the food! These cupcakes may have been the best cupcakes I've ever made. If you're a fan of s'mores then you'd probably agree. Graham cracker crust, moist chocolate cake filled with soft chocolate ganache, dipped in more graham crackers and topped with an oh-so-sticky and fluffy toasted marshmallowy meringue frosting. 

This recipe has a lot of components, but I swear they are all very simple and undemanding. You could even break this recipe down and complete it over the course of 2 days as the baked, unfrosted cupcakes would keep just beautifully in an airtight container overnight.


DSC_1266.jpg

S'mores Cupcakes
(Makes 24-30 cupcakes)

For the cake:
2 cups graham cracker crumbs, divided
1/3 cup butter, melted

2 cups plus 2 Tbsp sugar
1 3/4 cup all purpose flour
3/4 cup plus 1 Tbsp all natural cocoa powder
1 1/2 tsp baking powder
1 1/2 tsp baking soda
1 tsp salt
2 large eggs
1 cup whole milk
1/2 cup vegetable oil
2 tsp vanilla
1 cup VERY hot coffee

For the ganache:
8 oz semisweet chocolate, chopped
1 cup heavy cream

For the meringue frosting:
6 large egg whites
1 1/2 cups sugar
1/2 tsp cream of tartar
seeds from 1 vanilla bean, or 1 Tbsp vanilla extract

1. Preheat oven to 350 and line 2 muffin pans with cupcake liners. To make the graham cracker crust, mix 1 1/2 cups graham cracker crumbs with the melted butter in a small bowl until well combined. Evenly pack 1 Tablespoon of graham mixture into each cupcake liner (a shot glass works well for this.) Bake in the preheated oven for about 5 minutes, or just until lightly browned, and set aside to cool.

2. To make the cupcakes, Sift together the sugar, flour, cocoa powder, baking powder, baking soda and salt in the bowl of a stand mixer and mix with the paddle attachment just for a moment until well combined. In another large bowl mix together the eggs, milk, oil  and vanilla, then add to the flour mixture and beat on medium speed for about 30 seconds. Scrape down the bowl and continue mixing for another 2 minutes. Add the hot coffee and mix to combine. The batter will be very runny, this is fine!! 

3. Carefully fill each cupcake liner about 3/4 full with cupcake batter. Bake for 15-20 minutes, rotating halfway through, until a toothpick inserted into the center of a cupcake comes out clean. Remove from the oven and set on cooling racks and let the cakes cool in the tins for about 5 minutes. Remove from the tins and cool completely. At this point you can place the cupcakes in an airtight container if you'd like to decorate them the following day.

4. To make the ganache, place the chopped chocolate into a large bowl. In a heavy bottomed saucepan, bring the heavy cream to a bare simmer, then pour the hot cream over the chocolate. Let stand for about a minute, then whisk together the chocolate and cream until uniform and shiny. Set aside at room temperature to cool and set.

5. To make the meringue frosting, mix the egg whites, sugar and cream of tartar in the bowl of a stand mixer and place over a saucepan of simmering water. Whisk constantly until the sugar is fully dissolved (you will feel no granules of sugar when you rub it between your fingers) and is warm to the touch, about 3-5 minutes. Transfer to the stand mixer and bean with the whisk attachment, gradually increasing the speed from low to high, until stiff, glossy peaks form. Add the vanilla bean scrapings or vanilla extract and bean until combined. Transfer to a piping bag fitted with your favorite decorating tip.

6. To assemble, Cut a small hole into the top of each cupcake and fill with a heaping teaspoon of cool ganache. Cover the hole back up with the bit of removed cake and spread a small amount of ganache to cover the top of the cupcake. Dip into the remaining 1/2 cup of graham cracker crumbs to cover the ganache. Pipe a generous portion of meringue frosting on the center of the graham-cracker-dipped cupcakes. Using a small kitchen torch, carefully "toast" the meringue frosting. Decorate with a small piece of chocolate or piece of graham cracker if desired. Enjoy!

(Cake recipe adapted from Trophy Cupcakes)

Thursday, July 5, 2012

Strawberry Cupcakes with Strawberry Swiss Meringue Buttercram

Strawberry cupcakes

I've been meaning to post this for a while now. Strawberry season has come and gone here in CT - we're moving onto blueberries, raspberries and peaches, oh my! I certainly had my fun with strawberries though. Strawberry-rhubarb pie, strawberry-rhubarb vanilla bean jam, strawberry balsamic black pepper jam, strawberry lemonade, and of course, these sweet little strawberry cupcakes!

Pink isn't normally my thing, but these cupcakes were just so damn cute with their pretty pink frosting and little strawberries on top. The cupcake itself is a light, not too sweet vanilla based cupcake scented with strawberry. The buttercream is what packs the punch of strawberry flavor. Luckily, swiss meringue buttercream is light, airy and not sickeningly sweet, so don't be timid about piping on a generous portion atop each cupcake!

I used the strawberry-rhubarb jam I had canned a few days before, but you can use any high quality strawberry jam or preserve you have. Jam is a great way to flavor frosting so definitely play around with this recipe using different flavors throughout the year!   

Strawberry cupcakes
  
Strawberry Cupcakes with Strawberry Swiss Meringue Buttercream
(cupcake recipe adapted from Sprinkles' Cupcakes)

Strawberry Cupcakes
Makes 1 dozen

1 1/3 cup strawberries, pureed in a food processor or blender
1 1/2 cups flour, sifted
1 tsp baking powder
1/2 tsp baking soda
1/4 tsp kosher salt
1/4 cup room temp whole milk
1 tsp vanilla extract
1/2 cup unsalted butter, room temp
1 cup sugar
1 large egg, room temp
2 large egg whites, room temp

1. Preheat oven to 350F. Line a 12 cup muffin tray with cupcake liners and set aside. Place strawberry puree in a medium heavy bottomed skillet and cook over medium heat until it has reduced by about half. Set aside and cool.

2. In a medium bowl whisk together the flour, baking powder, baking soda and salt. In another bowl mix together milk, vanilla and reduced strawberry puree. Set aside.

3. In the bowl of an electric mixer fitted with the paddle attachment, cream the butter on medium high speed until light and creamy. Add the sugar and continue to beat until very well combined and fluffy, scraping down the sides of the bowl as needed. Beat in the egg and egg white just until combined.

4. Set the mixer on low and slowly add half the flour mixture, mixing until just moistened. Add the milk mixture and mix until just blended. Add the remaining flour mixture and mix until homogenous, scraping the sides of the bowl as needed.

5. Divide batter evenly among the muffin tin. Bake for 20-25 minutes, or until a toothpick or cake tester inserted into the center of a cupcake comes out with just a couple crumbs. Allow cupcakes to cool completely in the tin before frosting.

Strawberry Swiss Meringue Buttercream
Makes 3 1/2 cups (you will have extra)

5 large egg whites
1 1/2 cups sugar
4 stick (1 lb) unsalted butter, cut into tablespoon chunks and at room temp
seeds of 1 vanilla bean
1/2 cup strawberry jam or preserves
1/4 tsp salt

1. Combine the egg whites and sugar in the bowl of a stand mixture and set over simmering water. Heat mixture to 160F while whisking almost constantly.

2. Transfer hot mixture to the stand mixer fitted with the whisk attachment, add the vanilla bean seeds and salt, and beat on high speed until mixture doubles in volume, has stiff peaks and has cooled. This will take about 10-12 minutes.

3. Add the butter one piece at a time, mixing until completely incorporated after each addition. The mixture may begin to look lumpy, curdled, soupy or some other kind of awful, but don't worry! Just keep beating that sucker and it will come together into light, fluffy frosting. Once the buttercream is smooth and fluffy, add the  jam and mix until combined. Now you're ready to frost your cupcakes!

Monday, May 14, 2012

Peanut Butter & Jelly Bars

Peanut Butter and Jelly Bars

It's peanut butter jelly time! peanut butter jelly time! peanut butter jelly time! *banana dance*

That's pretty much all that went through my head as I made these. The internet has truly invaded my brain...

Anyway... short and sweet post to share this recipe with you all. These are totally delicious and you need to make them, especially if you're a lover of peanut butter & jelly sandwiches. You get all the sweet creaminess of a PB&J along with a crust that is somewhere between a shortbread cookie and a flaky pie crust and a crisp streusel topping that has a hint of cinnamon and a slight chew thanks to the oatmeal.

You can change these up a bit by using a different kind of jam, jelly or preserve. I used a mixture of homemade raspberry and blueberry jam from last summer and it was a winning combination, but your classic grape jelly or something more exotic would be equally as delicious I'm sure!

Peanut Butter & Jelly Bars
(adapted from Baked Explorations)

For the Pie Crust:
1 1/2 cups flour
1/4 cup sugar
1/4 tsp salt
1/2 cup unsalted butter, chilled and cut into 1/2 inch cubes
1 egg, lightly beaten

For the PB filling:
1 cup unsalted butter, room temperature
2 cups peanut butter (I used half creamy, half crunchy)
1 3/4 cup powdered sugar
1/2 tsp vanilla extract

For the Crumb Topping:
3/4 cup flour
1/2 tsp baking powder
1/4 tsp baking soda
1/4 tsp salt
1/4 tsp cinnamon
1/3 cup dark brown sugar
2/3 cup rolled oats
6 Tbsp unsalted butter, chilled and cut into 1/2 inch cubes

2 cups jelly, jam, or preserves

1. Butter the sides and bottom of a 9x13inch pan. Line with parchment paper leaving a slight overhang. Combine the flour, sugar and salt in the bowl of a food processor. Add the butter and pulse until it turns into a coarse, sand-like texture. Add the egg to the dough and pulse just until the dough holds together.

2. Scrape all the dough out into the prepared pan and firmly and evenly press it all over the bottom of the pan and slightly up the sides. Place the pan in the freezer for 30 minutes.

3. Preheat oven to 375F. Remove the pan from the freezer and the inside with aluminum foil. Fill the pan 3/4 way full with dried beans or pie weights. Bake for 15 minutes, then remove the foil and weights and bake for another 15 minutes or until the crust is lightly brown. Set on a wire rack to cool

4. Reduce oven temperature to 325F. In the bowl of a stand mixer with a paddle attachment beat the butter until completely smooth. Add the peanut butter and beat until well combined. Add the powdered sugar and vanilla and beat until smooth, scraping down the sides of the bowl. Pour the mixture out onto the cooled crust and spread evenly using an offset spatula or knife. Chill in the fridge while you prep the crumb topping.

5. In a large bowl whisk together the flour, baking powder, baking soda, salt and cinnamon. Add the sugar and mix it in with your fingers then stir in the oats. Mix in the butter cubes using your fingers or a pastry cutter until coarse crumbs form.

6. Spread the jelly/jam evenly over the peanut butter filling. Sprinkle on the crumb topping covering the jelly. Bake the bars for 20-25 minutes in the 325F oven, turning once, until the top is brown. Transfer the pan to a wire rack to cool completely then cut into 24 bars to serve. Store in an airtight container in the fridge.

Saturday, March 17, 2012

Irish Whiskey Salted Caramels

Irish Whiskey Caramels

It's St. Patrick's Day! Before you go out and get sloshed, I think you should spare a moment to whip up a batch of these delicious caramels. Or, if you should somehow have any whiskey left after the holiday, use up the extra!

I love making caramel, and these soft caramels may be my favorite batch so far. While the addition of whiskey here may not get ya drunk, it definitely adds a depth of flavor you wouldn't get otherwise. Between the chewy melt-in-your-mouth texture, hint of whiskey, the lovely dots of fresh vanilla bean, and delicate crunch of salt, I'd say these are just about perfect.

Wrap them up as a little gift, or stash them away and eat them all yourself!

Irish Whiskey Caramels  

Irish Whiskey Salted Caramels

Makes 30-45 candies, depending on how you cut them
1 cup heavy cream
5 Tbsp unsalted butter
1 tsp coarse salt, such as fleur de sel, plus more for sprinkling
1/2 cup Irish whiskey, such as Jameson
1 vanilla bean, split, seeds removed and reserved
1 1/2 cups sugar
1/4 cup corn syrup
1/4 cup water

1. Line the bottom and sides of an 8x8inch pan with parchment paper and set aside.

2. Combine cream, butter, salt, whiskey, and vanilla bean & reserved seeds in a small saucepan and bring to a boil. Remove from heat and set aside.

3. Combine sugar, corn syrup and water in a heavy bottomed 3 or 4 quart pot. Gently mix to moisten all of the sugar, then use a wet pastry brush to wash down the sides of the pot. Bring the mixture to a boil over medium to medium-high heat without stirring. When the sugar begins to darken in color and smell like caramel, gently swirl the pot until it turns a medium amber. Don't over do the caramelization here, it will darken further when you cook it with the cream mixture.

4. Remove from the heat and slowly and carefully add the cream mixture (remove the full vanilla bean first). It will bubble and simmer hard for a bit, and then settle down. Whisk vigorously as it starts to slow and once it stops simmering, return to medium-low heat and simmer until the temperature reads 248F on a candy thermometer, about 15 minutes or so, giving it a good whisking every couple minutes. Pour into the prepared baking pan, let it cool for a minute or 2 and then sprinkle with a little additional salt. Let cool at room temp for at least 2 hours, then cut into desired size with a very sharp knife and wrap in squares of wax paper. Store in an airtight container.

Monday, February 27, 2012

Chocolate Peanut Butter Celebration Cake

Chocolate Peanut Butter Cake 

I call this a Celebration cake because this is so rich and delicious that I'm pretty sure no human could handle eating this more than a couple times a year for a special occasion.

If you or someone you love enjoys pairing chocolate with peanut butter, then you must make this cake. Three layers of super moist sour cream chocolate cake, creamy peanut butter frosting, and a thick layer of gooey chocolate peanut butter ganache. Oh god my knees are weak after that description...

This cake is really pretty easy to make. Sure it has a few more steps than a boxed cake, but nothing tricky at all. The ganache topping is a very simple way to decorate, but makes a big impact. Make it for the next celebration with the peanut butter & chocolate lover in your life. Just make sure to keep a gallon or so of milk handy!

 
Chocolate Peanut Butter Cake

Chocolate Peanut Butter Celebration Cake

Makes one 8-inch, triple layer cake, Serves 14-18

2 cups all purpose flour
2 1/2 cups sugar
3/4 cup unsweetened dutch-process cocoa
2 tsp baking soda
1 tsp salt
1 cup vegetable oil
1 cup sour cream
1 1/2 cups water
2 Tbsp distilled white vinegar
1 tsp vanilla extract
2 whole eggs

1. Preheat oven to 350F. Butter the bottoms and sides of 3 8-inch cake pans and line the bottom of each pan with a round of parchment paper, then butter the parchment.

2. Sift the flour, sugar, cocoa, baking soda and salt into a large bowl and whisk together to combine thoroughly. Add the sour cream and oil and whisk to blend. Slowly blend in the water until smooth, then beat in the vinegar and extract. Whisk in the eggs and beat until well blended. Scrape the sides and bottoms of the bowl to be sure everything is well incorporated and blended, then divide evenly among the prepared cake pans.

3. Bake for 30-35 minutes or until a toothpick or cake tester comes out mostly clean. Let cool in pans for about 20 minutes, then invert onto wire racks, peel off the parchment paper and let cool completely. Freeze the cooled cakes for approximately 30-40 minutes to make them a firmer for frosting.

4. To assemble the cake, place one layer, flat side up on your cake stand or serving plate. Spread about 2/3 of a cup of peanut butter frosting evenly over the top, all the way to the edges. Repeat with the next layer. Place the final layer on top and using an offset spatula, frost the tops and sides with a small portion of the remaining frosting to make a thin, even layer of frosting. Chill for about 15 minutes. (This is the crumb coat. It's optional but it will make for a prettier product.) Evenly spread the rest of the frosting over the top and sides of the cake, smoothing as much as you can. Allow to chill again for another 15-30 minutes.

5. Pour the warm chocolate glaze on the top of the chilled cake and spread just to the edges. To get the prettiest drips, gently guide portions of the glaze over the edge to create the drips. Refrigerate for 30 minutes, uncovered, until the ganache sets.


Peanut Butter Frosting
Makes about 5 cups

10 oz cream cheese, room temperature
1 4 oz stick butter, room temperature
5 cups confectioners' sugar, sifted
2/3 cup smooth peanut butter, (like Skippy or Jif)
1 tsp vanilla extract

1. In a large bowl with an electric mixer, beat the cream cheese and butter until light and fluffy. Beat in the sugar 1 cup at a time, mixing well after each addition and frequently scraping down the sides of the bowl. Beat at medium speed until very light and fluffy, 3-4 minutes.

2. Add the peanut butter and beat until well blended.


Chocolate-Peanut Butter Glaze
Makes 1 1/2 cups

8 oz semisweet chocolate, chopped
3 Tbsp peanut butter
2 Tbsp light corn syrup
1/2 cup half and half

1. In the top of a double boiler set over simmering water, combine the chocolate, peanut butter and corn syrup. Cook, whisking frequently, until the chocolate is melted and smooth. (I found it looked a touch dull and a bit grainy at this point, but don't freak, the half and half will smooth it out.)

2. Remove from the heat and whisk in the half and half, mixing until smooth. Use while still warm.

Wednesday, February 15, 2012

Chocolate and Salted Caramel Pudding Parfaits

Chocolate and Salted Caramel Pudding Parfaits

I'll keep this short and sweet because I have very important things on my to-do list, folks. Like eating chocolate.

I've already discussed my feelings towards Valentine's Day back when I made my Sweetheart Cupcakes. As you can see I still enjoy making my sickeningly sweet little Valentine's goodies!

This was inspired by one of my favorite kinds of chocolates - gooey salted caramel enrobed in dark chocolate. These parfaits are really very simple and could be made for any occasion, I just dressed these up with some cookies my friend and I decorated. If you choose to make them in little half-pint mason jars like these they have the added bonus of being super portable - perfect for a potluck or a romantic picnic! :)

Chocolate and Salted Caramel Pudding Parfaits

Makes 6-8 servings
 
1 recipe Chocolate Pudding (still slightly warm or room temperature)
1 recipe Salted Caramel Pudding (still slightly warm or room temperature)
1 cup heavy cream, very cold
1 tsp vanilla sugar (plain sugar is just fine)
pinch of salt
Chopped chocolate, chocolate covered toffee and/or nuts for layering
Coarse sea salt

1. Start with a layer of the caramel pudding at the bottom of your jars/glasses, filling a little under a 1/4 way full. Then add a layer of the chocolate pudding to fill it about 1/2 way full. Add a little sprinkling of your choice of chopped chocolate, toffee or nuts and a few grains of course salt. Repeat with the caramel, chocolate and toppings to fill the cup. Cover and chill, at least 2 hours. (If you're planning to transport these with the whipped cream on top, you'll want to make thinner layers of pudding to make room for the cream and lid.)

2.  In a large bowl combine the the cream, sugar and pinch of salt. Whip with a whisk until soft-medium peaks form. Divide the whipped cream evenly amongst the parfaits and serve immediately.

Chocolate Pudding
 (adapted from The Essence of Chocolate by John Scharffenberger)

1/2 cup sugar
1/4 cup cornstarch
pinch of salt
3 cups whole milk
6 oz bittersweet chocolate, chopped
1 tsp vanilla extract

1. In a heavy bottomed pot combine the sugar, cornstarch and salt. Slowly whisk in the milk making sure to incorporate all the dry ingredients well. Cook over medium low heat, stirring frequently and scraping the sides and the bottom of the pan, until the mixture begins to thicken enough to coat the back of a spoon, 15-20 minutes. Stir in the chocolate and cook for another 2-4 minutes, or until the chocolate is melted and the mixture is thick. Remove from heat and stir in vanilla. 

2. Pour the mixture through a fine mesh strainer into a medium bowl. Press a piece of wax paper or plastic wrap directly on the surface of the pudding and set aside while you make the caramel pudding.

Salted Caramel Pudding

4 cups whole milk, divided
5 Tbsp cornstarch 
1 Tbsp vanilla extract
1/2 tsp coarse sea salt
1 cup sugar
6 Tbsp water
3 Tbsp salted butter

1. In a small bowl whisk together 1/2 cup milk, cornstarch, vanilla and salt. Set aside.

2. In a heavy saucepan, combine the sugar with the 6 Tbsp of water and bring to a boil. Cook over medium-high heat without stirring until the sugar turns a deep amber color. Watch this carefully because caramel can go from perfect to burnt VERY quickly. Remove from the heat and whisk in the butter - the caramel with bubble and foam. Then carefully whisk in the remaining 3 1/2 cups milk. The caramel will probably sizzle some more and seize up, but don't panic.. it will melt back in.

3. Return the pot to the stove and whisk over moderate heat until the caramel dissolves again. Simmer at medium-low heat, watching the pot carefully so it doesn't boil over, until the milk thickens and deepens a bit in color, about 10 minutes. 

4. Slowly whisk the cornstarch mixture into the caramel mixture and cook until the mixture thickens, about 1 minute. Strain the mixture through a mesh strainer into a small bowl. Press a piece of wax paper or plastic wrap directly on the surface of the pudding until ready to portion out into the parfaits. 


Tuesday, January 24, 2012

Peanut Butter Kahlua Brownies

Peanut Butter Kahlua Brownies  

I continue my reign of terror on my family and friends' diets with these boozy, peanut buttery, chocolate chunk brownies. It takes a lot of willpower to live with me... it takes much more to BE me! If I baked everything that I really wanted to, oh good lord we would all be doomed. 

I can't take all the credit for these brownies. My mom started mixing Kahlua and peanut butter into boxed brownie batter several years ago. It was a damn good idea! I've just taken it a step further and adapted one of my favorite brownie recipes to include these flavors. 

These brownies aren't for cakey brownie lovers. They are deeply chocolatey, dense, rich and fudgy. You get a hint of booziness when you first bite into one, followed by chocolate that is intensified by the coffee liqueur, and finally just a bit of nutty satisfaction from the peanut butter.

Be careful, because these might just turn into your new favorite brownie. They are addictive. Every time you walk past the plate full of them you'll take just a little piece... then another nibble... and before you know it they will all be gone!


Peanut Butter Kahlua Brownies  

Peanut Butter Kahlua Brownies

1/3 cup dutch-process cocoa
2 tsp espresso powder
3/4 cup coffee liqueur
2 oz unsweetened chocolate, finely chopped
4 Tbsp unsalted butter, melted
1/2 cup vegetable oil
1 1/4 cup peanut butter, divided (I use all natural, unsalted)
2 large eggs
2 large egg yolks
2 tsp vanilla
2 1/2 cups sugar
1 3/4 cup flour
3/4 tsp salt
6 oz semisweet or bittersweet chocolate, chopped

1. Place rack on second lowest position in oven and preheat to 350F. Line a 9x13 inch pan with parchment leaving excess around the edges (or foil sprayed with cooking spray.)

2. Bring the coffee liqueur almost to a boil, and in a large bowl whisk the hot liqueur into the cocoa and espresso powder until smooth. Add the unsweetened chocolate and whisk until melted, then whisk in the melted butter, oil and 1/2 cup peanut butter. It may look a little funky and curdled, but don't worry. Now whisk in the eggs, egg yolks and vanilla until smooth. Whisk in the sugar until fully incorporated. Switch to a rubber spatula and fold in the flour, salt and chopped semisweet/bittersweet chocolate just until incorporated.

3. Scrape the batter into the prepared pan and smooth out the top. Take the remaining 3/4 cup peanut butter and evenly drop dollops of it all over the top of the brownie mixture and use a knife to swirl it around the top of the batter (depending on the kind of peanut butter you're using, you may want to warm your peanut butter slightly to give it a looser consistency for swirling.) Bake until a toothpick inserted halfway between the edge and the center of the pan comes out with just a few moist crumbs on it, about 30-35 minutes. Don't overbake them! 

4. Let cool in the pan on a wire rack for at least 1 1/2 hours. Lift the brownies from the pan using the parchment paper or foil and cut into desired size. 

Wednesday, January 4, 2012

Chocolate Peanut Butter Banana Bacon Bread Pudding

Chocolate Peanut Butter Banana Bacon Bread Pudding

Is one of your New Year's resolutions to eat more sugar, cream, chocolate, peanut butter and bacon? If so, I've got you covered! Why eat vegetables when you can eat all of that in one bite?!

This is basically an Elvis sandwich turned into a soft, custardy bread pudding. Plus a little chocolate. And a little bourbon. Because WHY NOT? It has bananas in it! That's good for you, right?

Bread pudding is one of my favorite foods. It's one of those things that you can so easily adapt to different flavors. Sweet OR savory. This happens to combine both! Sweet, soft bread meets creamy peanut butter, fruity bananas, pockets of melted, slightly bitter chocolate and, of course, salty bacon! We brought this monstrosity to a friends house and ate it alongside some delicious freshly made toasted almond ice cream which really balanced the flavors and sweetness of this dessert. Definitely spring for a scoop of ice cream next to this for a texture and temperature contrast!

This was sort of a last hoorah before heading into the dead winter months to recover from weeks of holiday gluttony. As delicious as it is, eventually I do get sick of eating nothing but crap and can't wait to stuff some veggies in my face instead. I do like vegetables too, after all. If you're looking for a special occasion treat, definitely give this a try. The recipe below reflects a couple changes I would make to it next time - mainly candying the bacon. It's best if you let the bread sit in the custard at least overnight, so plan ahead. Enjoy!

Chocolate Peanut Butter Banana Bacon Bread Pudding

Chocolate Peanut Butter Banana Bacon Bread Pudding
(Adapted from the Caseus Cookbook)

1 lb bacon
1/3 cup light brown sugar
1 1lb loaf brioche
2 cups natural, unsalted peanut butter
12 oz of your favorite dark chocolate bar
2 ripe bananas, sliced
4 cups heavy cream
4 eggs
1 Tbsp vanilla extract, or beans of 1/2 vanilla bean
1/4 cup bourbon
1 1/4 cup light brown sugar
Pinch kosher salt

1. To candy the bacon, line 2 large baking sheets with rims with foil for easier cleanup. Preheat oven to 350F. Place the 1/3 cup of brown sugar in a shallow bowl and press one side of each slice of bacon firmly into the sugar to coat. Arrange the slices of bacon in a single layer on the baking sheets sugar side up. If there's any remaining sugar, sprinkle it evenly over the bacon. Bake until the bacon is nicely crisp and the sugar is bubbling, 15-25 minutes, depending on the thickness of the bacon. Transfer to paper towels to drain briefly, then to a plate and set aside and reserve some of the bacon fat in the pans.

2. Slice the brioche loaf into 1-inch thick slices. Spread each slice of bread with even amounts of peanut butter, then top half of the slices evenly with several pieces of chocolate, some banana slices and a few strips of bacon. Sandwich the slices with all the fixins with the slices of bread with only peanut butter. Using a sharp knife, cut each sandwich into quarters. 

3. Grease a deep 9x13inch pan with a bit of the reserved bacon fat, then arrange the sandwich pieces in the pan. 

4. In a large bowl whisk together the cream, eggs, vanilla, bourbon, brown sugar and salt until very well combined. Pour most, but not all, of this custard mixture over the sandwiches in the pan and use your hand to gently work some of the custard into the bread while slowly adding the rest of the custard. Cover tightly with plastic wrap and refrigerate for at least 8 hours, but ideally overnight until the custard is well absorbed by the bread. 

6. When ready to bake, preheat the oven to 375F and spray the top of the bread pudding lightly with cooking spray. Cover tightly with foil and bake for 30-45 minutes, or until slightly firm and puffy. Remove the foil and continue to bake for another 15-20 minutes, or until the top is browned. Remove from oven and let rest for about 15 minutes. Serve with lightly sweetened whipped cream or delicious, delicious ice cream!